
Help
Quick answers to the questions we get most often. Click a question to expand the answer.
How do I start a recording?
From the home screen, tap the big Record button. The app starts capturing audio immediately, using the codec, bitrate and sample rate set in Settings. Tap Stop to finish — your file appears in the file list.
If a foreground notification appears, that is normal: Android requires it to keep the recording alive when the screen turns off.
Which format should I pick?
A quick guide:
- MP3 — universal, good size/quality trade-off, works everywhere.
- M4A (AAC) — like MP3 but smaller at the same quality. Good default.
- OGG Vorbis / OPUS — open formats, smaller than MP3. OPUS is excellent for voice at low bitrate.
- FLAC — lossless. Bigger files, but no quality loss. Use for music or archival.
- WAV (PCM) — uncompressed. Largest files, perfect quality. Use for editing/processing.
- WMA — for compatibility with Windows-only workflows.
- Speex — older voice codec, low bitrate, narrow-band.
Change the format any time in Settings → Recording → Format.
Where are my recordings saved?
By default, RecForge II writes to the Music public folder. Files there are visible over USB and survive an uninstall.
You can change the destination in Settings → Storage. If you pick a private RecForge folder, files are app-private and deleted on uninstall — back up regularly.
Recordings are named after the moment they were made, for example 20260812_143005.wav — year, month, day, then hour, minutes, seconds. If you are hunting for a file with a file manager, that is the pattern to look for.
How do I turn off Automatic Gain Control?
This is what most people come to RecForge II for, so it is worth doing properly.
Go to Settings → Recording, set Source to Front microphone, then enable Disable AGC.
Automatic Gain Control is the processing Android applies to level out loud and quiet passages. It is useful for a phone call and harmful for a recording: it pumps, it raises the noise floor between words, and it flattens the dynamics of music. With it off, what reaches the microphone is what lands in the file — which also means you are now responsible for the level. See the next answer.
Not every device exposes an unprocessed input. On some, the option changes nothing; on a few, only the Back microphone gives a clean signal. It is worth a thirty-second test before an important recording.
How do I set the recording level?
Two ways, and the first is better:
Before you record — long-press the Record button to open Preview mode. You will hear and see the level without writing a file. Adjust the gain with the slider above the timer, then tap the validation button to start recording for real. This is the right habit: set the gain on the sound you are about to capture, not on the one you already lost.
While recording — open the waveform panel (slide the control panel up or down), and use the same slider.
Aim for peaks that stay clear of the top of the scale. A recording that is a little too quiet can be lifted afterwards; one that clipped cannot be repaired.
What is Compatibility mode?
Settings → Recording → Compatibility mode, and the default is on. Leave it on unless you have a reason.
44100 Hz is the only sample rate guaranteed to work on every Android device. With compatibility mode on, RecForge II always records at 44100 Hz and resamples to the rate you asked for. With it off, it records directly at your chosen rate — slightly less CPU, and on a capable device a genuine 48000 Hz capture.
The catch: on some devices, some rates simply do not work, and instead of an error you get silence, a loud buzz, or audio played back at double or triple speed. If that happens, turn compatibility mode back on.
Can I use an external microphone?
Yes, and nothing needs to be configured in the app — plug it in and Android routes it.
Most phones use a TRRS (4-conductor) 3.5 mm jack, which carries left, right, microphone and ground. A plain microphone with a TRS plug — three conductors, no microphone ring — will not be seen at all.
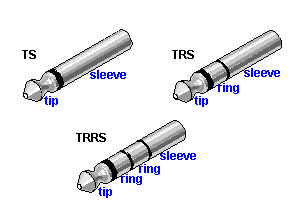
You need either a TRRS adapter or a microphone designed for phones — RODE smartLav+, RODE SC6, iRig Mic, iRig Cast and iRig Pre are known to work.
The order of those four conductors is not universal. Two wirings exist, and they swap microphone and ground on the last two contacts:
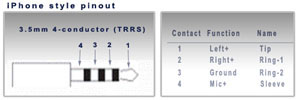
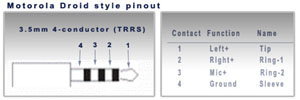
CTIA (the first one, historically labelled "iPhone style") is what essentially every current phone uses, Android included. OMTP (the second, labelled here after the original Motorola Droid) was common around 2010 and has been abandoned since. Plug an OMTP headset into a CTIA phone and you get the classic symptom: sound plays, but the microphone is silent or reduced to a faint hiss. Inexpensive OMTP-to-CTIA adapters fix it.
If a microphone is plugged in but not used, restart the app — the routing is decided when the audio session opens.
On a device with no jack, a USB-C audio interface generally works the same way, as long as Android exposes it as a recording input.
The app records silence, or stops, when the screen goes off
Some devices cut the microphone when the screen turns off. Enable Settings → Prevent phone from sleeping — it keeps the screen on while recording or playing.
If recording stops after a few minutes rather than immediately, the cause is different: your device is closing the app to save battery. See the next answer.
Recording stops on its own after a few minutes
Almost always a battery optimizer, a task killer or a "cleaner" app closing RecForge II in the background.
Add RecForge II to the battery whitelist: Android Settings → Apps → RecForge II → Battery → Don't optimize. Manufacturer-specific steps are collected at dontkillmyapp.com — the behaviour differs a lot between Xiaomi, Samsung, Huawei, OPPO and the rest.
If you have a cleaner app installed, add RecForge II and your recordings folder to its ignore list. These apps routinely classify audio files as junk and delete them.
What are the .recforge2 files?
They are waveform caches: they let the app draw the audio shape instantly instead of decoding the whole file again. They contain no audio and you never need to back them up.
You can delete them safely. The only consequence is that the next time you open that recording, the waveform has to be computed again, which takes a moment on a long file.
You will not always see them next to your recordings. When a file lives in the shared Music folder, Android refuses that extension there, so the cache is written to the app's private storage instead.
I can't find my files when I connect the phone to a computer
This happens with MTP: the computer sees a cached listing rather than the current one. Restart the phone, or reconnect the cable, and the folder usually appears.
If a recording is visible in RecForge II but not from the computer, it is in a private app folder rather than in Music. Android hides those from other apps and from USB. Move it: Settings → Storage offers to move private recordings to the shared Music folder.
Can RecForge II record phone calls?
No. Android does not allow an app to capture the audio of a phone call, and RecForge II does not attempt it. This is a platform restriction, not a missing feature.
Can I schedule a recording?
Not at the moment. Scheduled recordings and home screen widgets were disabled in version 1.2.8.5 and have not come back yet.
I see ads — can I remove them?
The free version is ad-supported, through Google AdMob. To remove ads, you have two options:
- use a Premium bundle bought before it was withdrawn from sale, or
- install the separate RecForge II Pro listing on the Play Store.
You can also revoke ad consent — still ad-supported, but with non-personalized ads — in Settings → Privacy → Reopen consent form.
What do taps and long-presses do on the waveform?
This is the least discoverable part of the app, and the most useful once you know it. Where you long-press decides what happens. The waveform is split into three zones:
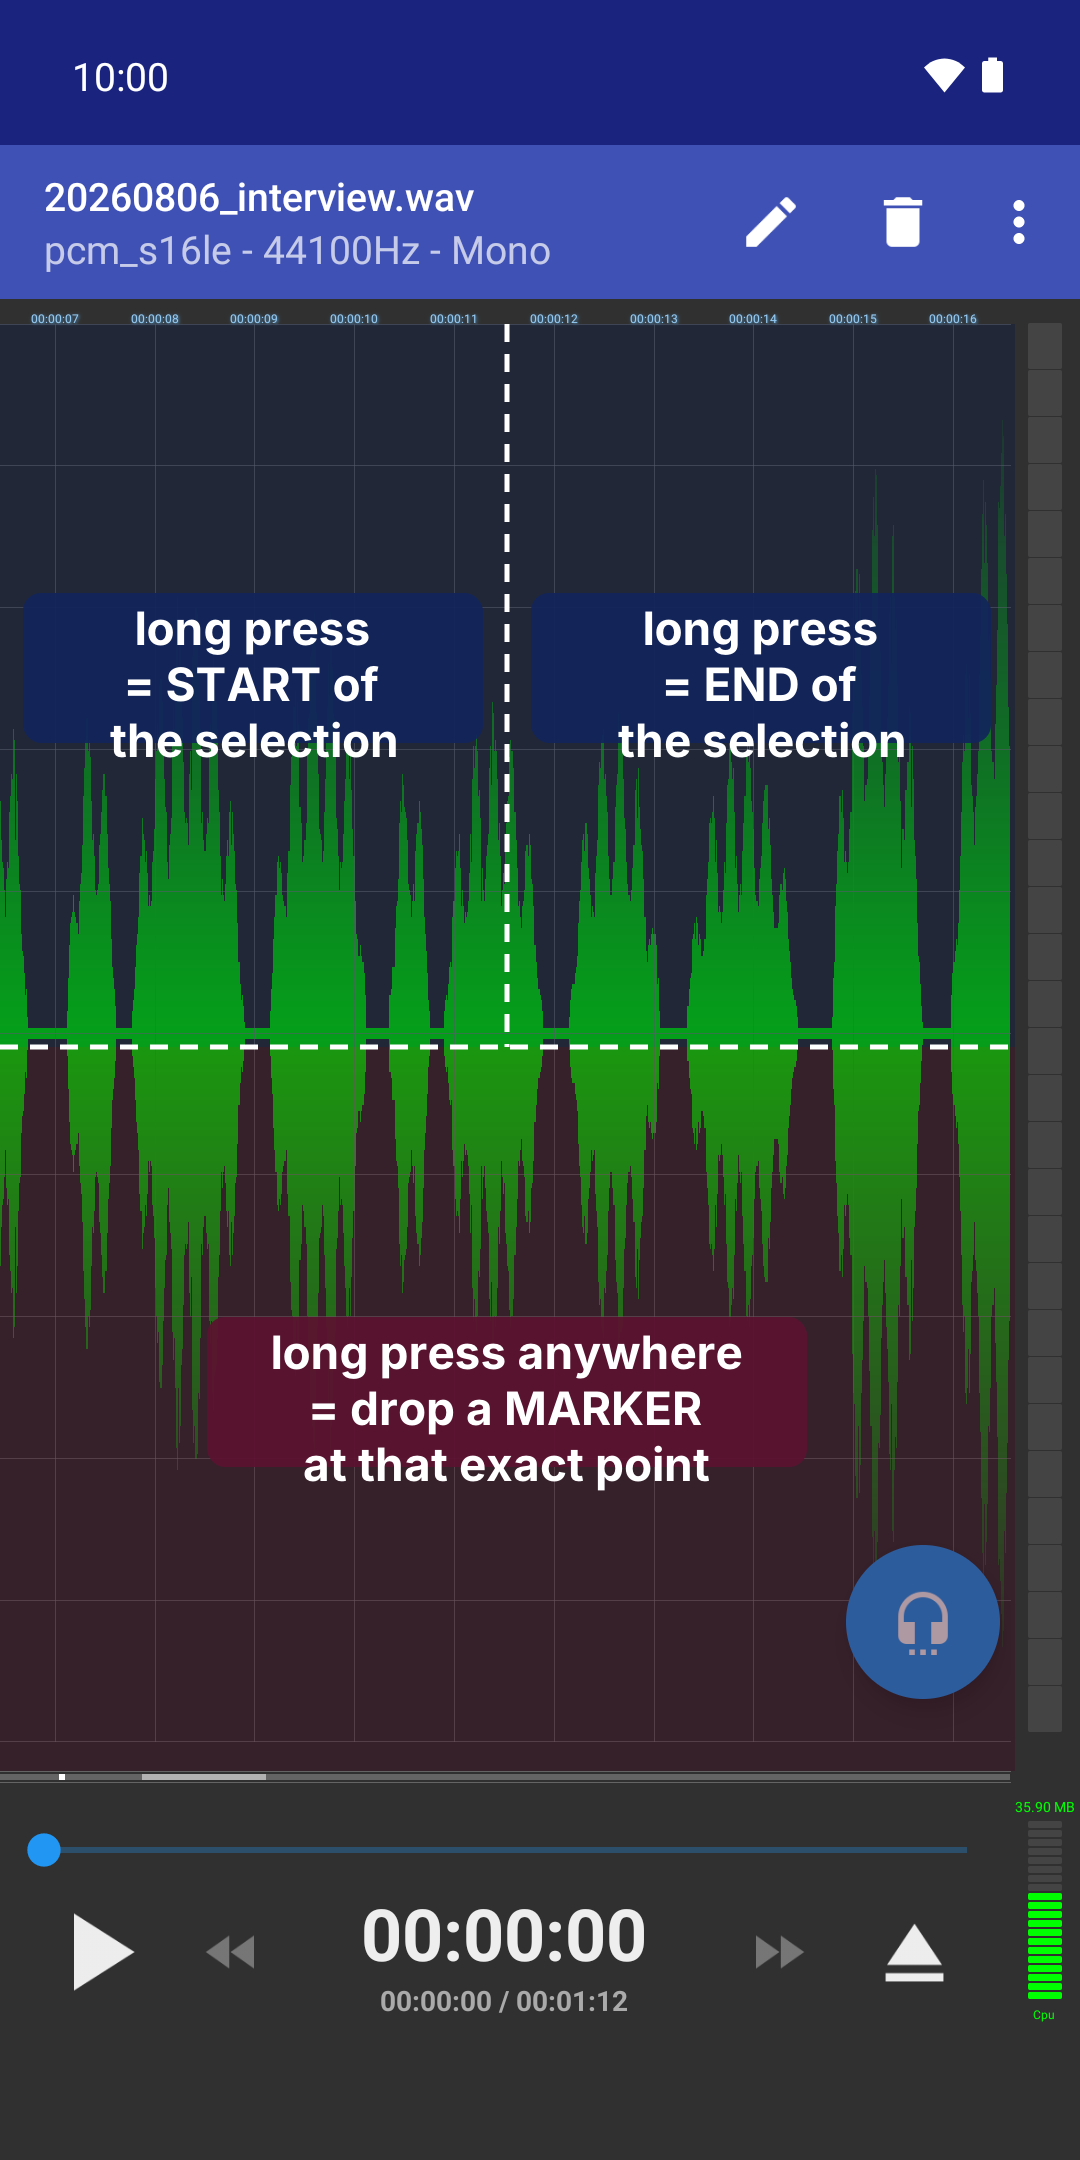
- Upper half, left side — long-press sets the begin of the selection.
- Upper half, right side — long-press sets the end of the selection.
- Lower half, anywhere — long-press drops a marker at that point.
The split is exactly at the middle of the view, horizontally and vertically. Nothing needs to be selected or armed first — the zone alone determines the action. If vibration is enabled in the settings, a short buzz confirms the long-press was registered.
Everywhere on the waveform, a simple tap moves the playback position (seek), and dragging sideways scrolls through the file.
One thing worth knowing: you can drop markers while a recording is in progress, not only afterwards — and during a recording the whole waveform becomes a marker zone, upper half included, since there is nothing to select yet. If you are recording an interview or a rehearsal, long-press whenever something notable happens. You will find those moments instantly afterwards, instead of scrubbing through an hour of audio.
How do I use markers?
Markers are named points saved alongside a recording. Use them to bookmark a question in an interview, the start of a take, a passage to transcribe, or a mistake to fix.
- Create — long-press on the lower half of the waveform. The marker lands at the position you pressed, both horizontally (the time) and vertically (its height on screen, so you can stack markers without them overlapping).
- Rename — double-tap a marker and type its label.
- Move — long-press it and drag. It follows your finger until you release.
- Delete — long-press it and drag it to the bottom of the screen.
Markers are stored with the file and survive closing the app.
Cut, Crop, Merge, Concat — what is the difference?
Four operations that are easy to confuse. The first two work on a selection inside one file; the last two combine several files.
- Cut — removes the selected part, and keeps everything else. Use it to drop a cough, a silence, a false start.
- Crop — the opposite: keeps only the selection and discards the rest. Use it to extract one passage from a long recording.
- Concat — chains files one after another, end to end. Three 1-minute files give one 3-minute file.
- Merge — superimposes files, so they play at the same time. Three 1-minute files give one 1-minute file with all three sounding together.
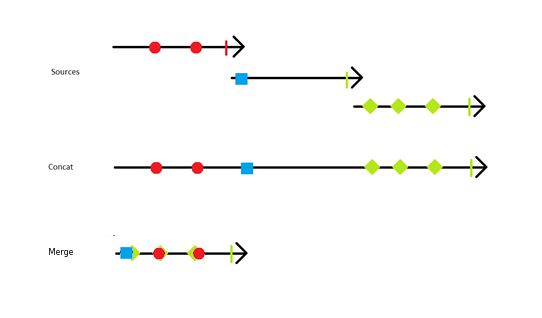
For Cut selection and Crop selection, set your selection in the waveform view (see the long-press zones above), then open the ⋮ menu at the top right and pick the operation.
Merge and Concatenate are in that same ⋮ menu — they ask you which other file to combine with the current one. You can also start from the list instead: select several files, then choose Merge or Concatenate from the action bar.
How do I select and manage several files at once?
Long-press a file in the list to enter selection mode, then tap any other files you want to include. The action bar at the top then offers:
- Rename, Delete
- Cut / Copy, then navigate to the destination folder and use Paste — this is how you move recordings between folders inside the app.
- Share
- Concat / Merge on the selection.
Cut and Copy behave like a file manager: the selection is remembered, and nothing happens until you paste. A Cut followed by a Paste moves the files; a Copy followed by a Paste duplicates them.
Can I record over a backing track?
Yes. Open the file, then pick Use as Backing track from the ⋮ menu (it is also available on a file selected in the list). RecForge II plays that file while it records you, so you can sing or play along, or record a voice-over on top of music.
Use headphones. Through the phone speaker, the backing track leaks back into the microphone and ends up in your recording. For that reason, live monitoring is automatically turned off in this mode.
The result is a new recording containing your performance. If you want the backing track and your take combined into a single file, record first, then use Merge on the two files.
Can I convert an existing audio or video file?
Yes. Open the file and choose Conversion from the ⋮ menu, then pick the target codec, sample rate and bitrate. RecForge II decodes the source and writes a new file in the format you chose.
This works with audio files (.mp3, .ogg, .wav, .wma, .flac, .opus, .m4a, .aac, .amr, .3gp, .ac3, .eac3, .mp2, .m2a, .mka) and with video files (.mp4, .mkv, .avi, .mov, .webm, .flv, .ogv, .wmv, .3g2, .m4v, .f4v) — the audio track is extracted and re-encoded.
Where are the playback options (loop, tempo, volume)?
Behind the round headphone button, at the bottom right of the waveform view. It is the single least obvious control in the app: the icon suggests monitoring, but it opens the playback options.
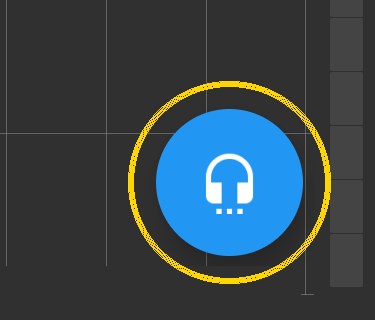
Tapping it reveals three sections, each of which expands:
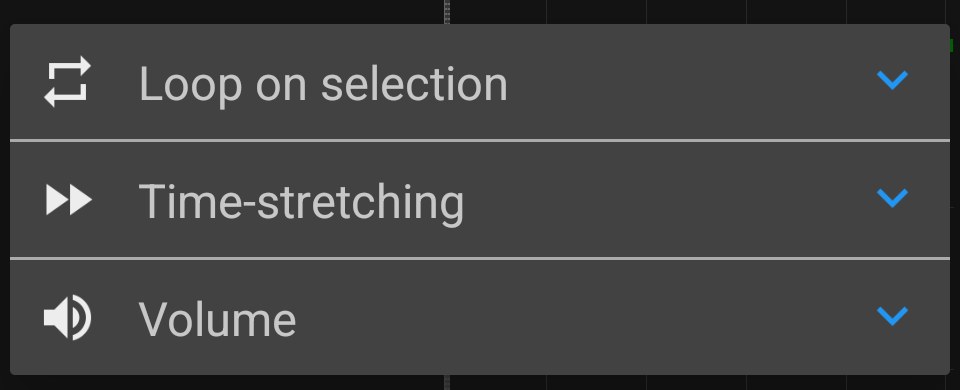
- Loop on selection — repeat the selected passage.
- Time-stretching — tempo, pitch and playing rate.
- Volume — playback level.
How do I change tempo, pitch or playback rate?
Tap the headphone button in the waveform view, then expand Time-stretching. You get three sliders:
- Tempo — speed without changing the pitch (handy for transcription and music practice).
- Pitch — pitch without changing the speed (transposition).
- Playing rate — speed and pitch together (classic fast-forward).
A Speech checkbox switches the algorithm to one tuned for voice rather than music; on spoken word it sounds noticeably cleaner at strong tempo changes. Reset puts all three sliders back to neutral.
These sliders only affect playback. To keep the result, tap Export — it writes a new file with the stretching applied.
The settings persist between files. If playback sounds wrong on a recording you know is fine, check here first — a forgotten rate change is the usual explanation, and Reset fixes it in one tap.
How do I loop part of a file?
In the waveform view, set the begin and end of your selection with a long-press on the upper-left and upper-right of the waveform (see the long-press zones above), then tap the round headphone button at the bottom right and expand Loop on selection.
Playback then repeats that passage indefinitely. It is the fastest way to transcribe a difficult sentence, learn lines, memorise a passage, or practise one bar of music — and it combines well with the Tempo slider, which slows the passage down without dropping its pitch.
The loop stays on until you turn it off, so if playback seems stuck on the same few seconds, look here first.
How do I edit audio tags or set cover art?
Open the file and choose Metadata from the ⋮ menu. You can edit title, artist, album, year, genre, comment and cover art. RecForge II writes the tags using the right format for the codec (ID3v2 for MP3, Vorbis comments for OGG/OPUS, iTunes-style for M4A, etc.).
Can I record while another app uses the microphone?
No — Android only allows one app at a time to access the microphone. Close other recording or call apps first.
How do I back up my recordings?
If you record into the Music public folder (default), recordings are visible over USB and you can simply copy them to your computer. They also survive an uninstall.
If you record into a private folder, use the Share action to send them to Drive, Dropbox or your email — or move them to the Music folder from Settings → Storage, which is the safer arrangement in the long run.
You do not need to back up the .recforge2 files.
Still stuck?
For any other question, write to us at dje073@gmail.com — please include the Android version and the device model. We answer within a couple of days.